You must complete ALL steps in this section to commence your program.
Step 1: Equipment Requirements
Every student must bring with them a Windows or Apple Mac laptop (NOT an iPad, Android tablet, or Chromebook) to Orientation Day which is:
- is less than 4 years old,
- is running at least Windows 10, or macOS Big Sur (version 11.0) in English,
- has Office 365 installed in English,
- has Google Chrome installed in English (you can download this on arrival),
- has Microsoft .NET Framework 3.5 installed (Windows only).
To see the Personal Electronic Device Guidelines, click here.
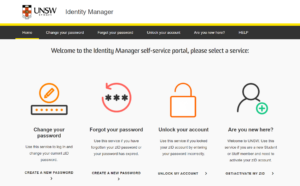
Step 2: Activate Your zID
zID is your unique student ID number when you study at UNSW College.
You can activate your zID here: https://iam.unsw.edu.au/home
Not sure about your zID?
Your zID will be emailed to you before your Orientation Day. It will be sent to the personal email address which was used for your College application. If you still have not received your zID one week before your Orientation Day, please contact [email protected] and include your full name and cID.
Step 3: Set Up Your Student Email
Please sign in HERE to Outook using the information below:
- Your Username: [email protected] (eg. [email protected])
- Your Password: Your zID password
Email is the main way that UNSW staff communicate with students. We will email you about course information, exams, enrolment and of course, lots of exciting opportunities for you to join!
Step 4: Set Up Multi Factor Authentication (MFA)
Multi-Factor Authentication (MFA) is a requirement at UNSW for everyone with a current zID account. MFA is a multi-step account login process that requires users to enter an additional code on top of their password. This provides an additional layer of security to help protect the University and your account from unauthorised access.
Our University uses the Microsoft Authenticator app, which needs to be installed on your smartphone before completing the MFA registration on your computer. Once set up, Microsoft Authenticator will periodically send you codes to verify your sign-in to single sign-on (SSO) applications such as Outlook, Moodle, and SharePoint.
Follow the instructions in the ‘Set Up MFA’ section on this page.
Important: Do not delete the MFA once you have set it up. If you delete the MFA or get a new device, you will need to call UNSW IT to reset it. For MFA technical issues and assistance contact the IT Service Centre on (02) 9385 1333 and select MFA from the options.
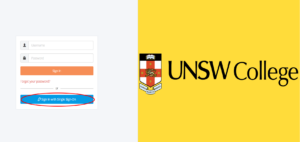
Step 5: Log In and Update Your Student Portal
Now you can open your Student Portal and click on the blue bar to log in using the information below:
- Your Username: [email protected] (eg. [email protected])
You will get a MFA notification to approve on your smart phone.
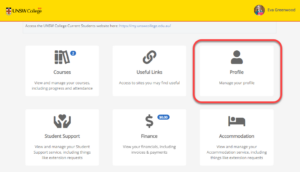
Click on Profile and complete the following 3 tasks:
- Upload a photo of yourself (similar to a passport photo, where your face is clearly shown).
- Update your local Sydney address and local mobile phone number.
- Update your emergency contact information
Tips: Make sure the photo you upload meets the requirement. Here are some examples:
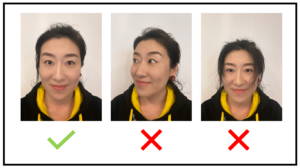
Please keep in mind that inappropriate photos, animated characters, or avatars are not permitted and you can be subject to breaching the code of conduct by not conforming to this requirement.
You can also update your preferred name (nickname, English name, etc.) in the Student Portal. A few important things to note:
- If you add a preferred name, it will appear in Allocate+ and will replace your first name on Attendance pages.
- In the Student Portal and other internal systems, your legal name will remain unaffected and will continue to be displayed along with your preferred name (if you choose to upload one).
- Please keep in mind that legal names remain editable only by College staff and only if providing supporting documentation. To request a change on your legal name, please email the Enrolments Team.
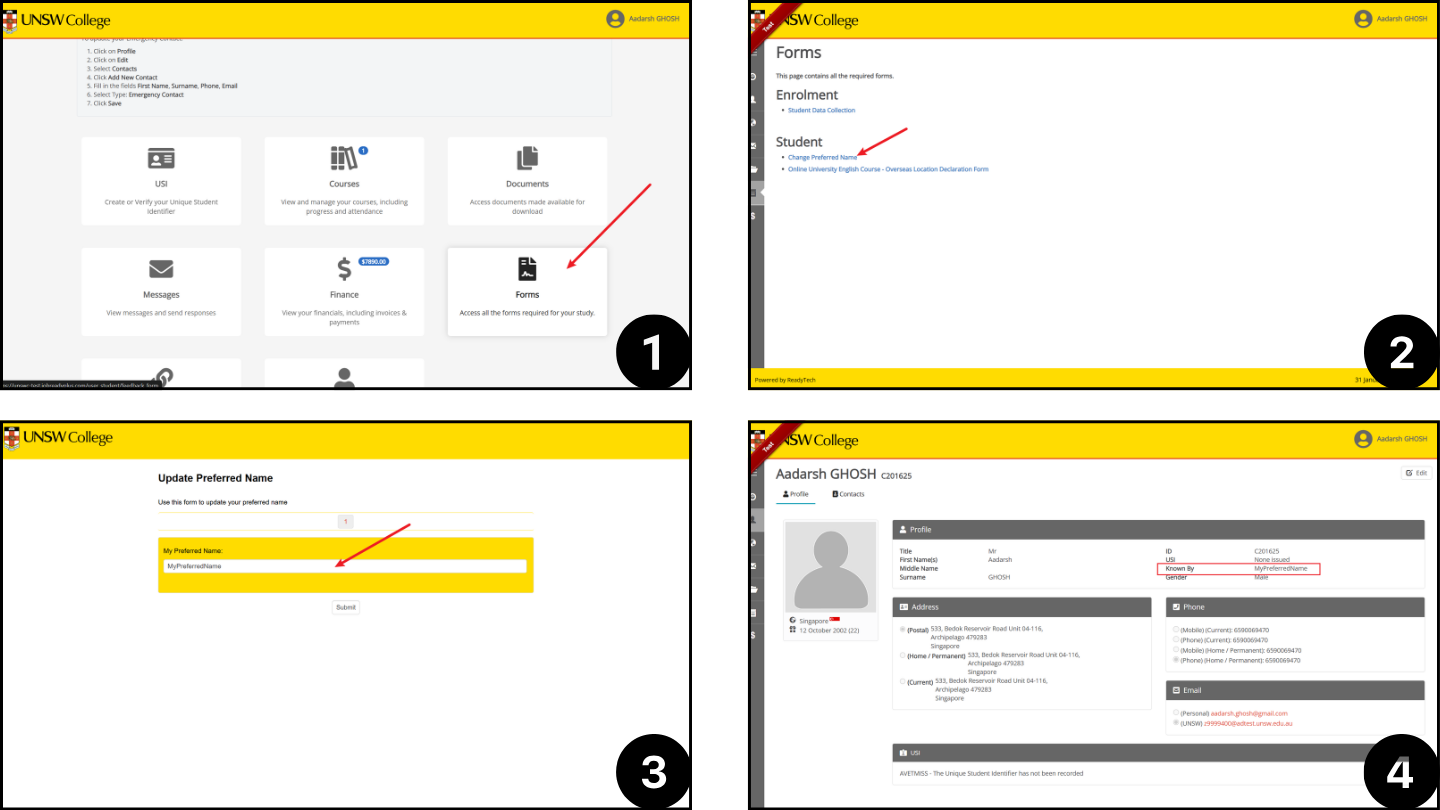
To upload your preferred name:
- Click on Forms.
- Then click Change Preferred Name.
- Enter your preferred name and click Submit.
- You should now see your preferred name on your profile.
Once you have arrived in Australia, you must also cr Unique Student Identifier (USI) and verify it in the Student Portal.
Without one, you cannot receive your qualification or statement of attainment and your graduation cannot be finalised. You can find detailed instructions here on how to complete this process.
A reminder that you can only create a USI when you are physically in Australia.
Step 6: Get Enrolled in Classes
Now it is time for you to enrol in your classes and build your own class timetable!
This Pre-Masters Student Self-Enrolment Guide lists the courses that you need to enrol in and will take you through the step-by-step process to enrol in your courses. You will need to enrol in each of the individual courses you intend to study using the Subject Enrolment Form located on your Student Portal which can be found under “Useful Links”.
You can also view the resource below to assist you with your self-enrolment:
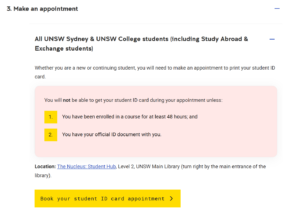
Make sure you have been enrolled in your courses for at least 48 hours before you try to book an appointment to get your student card. If you try to book earlier, UNSW will not be able to provide this to you.
Enrolment Checklist:
- Receive an email from UNSW College which confirms your enrolment date.
- Login to your Student Portal using your zID and password.
- Enrol in your courses and your classes in order to create your timetable. Students are responsible for creating their own timetables.
- Check your emails regularly for updated enrolment information.
- Click here if you need help deciphering your course codes and locations in your timetable.
If you have any questions about your enrolment, please contact the Pre-Masters Team at [email protected].
Step 7: Access Your UNSW Moodle Account
You can access Moodle here. Moodle is your online learning platform where you will find all your UNSW course information, class materials, assignment outlines, exam details and your teacher’s contact information.
Log in using your [email protected] (e.g. [email protected]). When logging in, you will also receive a MFA notification on your smart phone that you must approve.
If you have any login problems with Moodle please email the UNSW College IT Team at [email protected]
In your email, please include your zID, describe in as much detail as you can the issues you are having with Moodle, and include screenshots where possible.
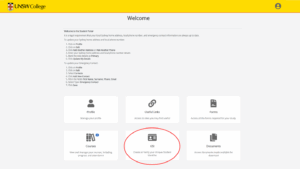
Step 8: Make A Student ID Card Appointment
Students must carry their UNSW student ID card at all times. You can use your student ID card to register attendance at classes and exams, access the library and borrow resources, join clubs and societies, get discounts, and so much more!
Click here to book your student ID card appointment.
Please scroll down the page to open up Step 3 “Make an appointment” and click on the yellow button “Book your student ID card appointment”.
We highly recommend you to take a photo of your student ID card when you receive it, in case you lose it and need to show proof of identification.
Step 9: Have you connected with your new classmates in your Buddy Group?
You have been automatically enrolled in the College Buddy Program and placed in a group with other new students. This is designed to help you settle in more quickly, get help with any questions, and most importantly make new friends!
If you do not know how to find your Buddy Group, please visit the Buddy Program Booth on your Orientation Day.